【10分でわかる👉】TypeScriptでDesign Pattern〜Command Pattern〜
どうも、ちゃんなるです!
今回は、Command Patternを紹介します🖐️

概要
Command Patternは、オブジェクト指向プログラミングにおいて、操作をオブジェクトとしてカプセル化することで、呼び出し側と実行側を分離します。
これにより、コードの拡張性や再利用性が向上し、メンテナンスが容易になります。
今回示すプログラムの設計
オンラインショッピングサイトで、商品の追加や削除といった操作を行うプログラムを設計してみます👍
Command Patternを用いて、これらの操作を簡単に実装・拡張できるようにしましょう🖐️
クラス図

| クラス名 | 役割 |
|---|---|
| Product | 商品を表現する |
| Invoker | コマンドの実行を行う |
| Command | コマンドのインターフェース |
| AddProductCommand | 商品追加のコマンド |
| RemoveProductCommand | 商品削除のコマンド |
| ProductManager | 商品の管理を行う |
サンプルコード
class Product {
    constructor(public name: string) {}
}
interface Command {
    Execute(): void;
}
class AddProductCommand implements Command {
    constructor(private productManager: ProductManager, private product: Product) {}

    Execute(): void {
        this.productManager.AddProduct(this.product);
    }
}
class RemoveProductCommand implements Command {
    constructor(private productManager: ProductManager, private product: Product) {}

    Execute(): void {
        this.productManager.RemoveProduct(this.product);
    }
}
class ProductManager {
    private products: Product[] = [];

    AddProduct(product: Product): void {
        this.products.push(product);
        console.log(`Product added: ${product.name}`);
    }

    RemoveProduct(product: Product): void {
        const index = this.products.indexOf(product);
        if (index > -1) {
            this.products.splice(index, 1);
            console.log(`Product removed: ${product.name}`);
        }
    }
}
class Invoker {
    ExecuteCommand(command: Command): void {
        command.Execute();
    }
}
では、実際に使ってみましょう🖐️
const productManager = new ProductManager();
const invoker = new Invoker();

const product1 = new Product('Apple');
const product2 = new Product('Banana');

const addProductCommand1 = new AddProductCommand(productManager, product1);
const addProductCommand2 = new AddProductCommand(productManager, product2);

const removeProductCommand1 = new RemoveProductCommand(productManager, product1);
// 商品の追加
invoker.ExecuteCommand(addProductCommand1);
invoker.ExecuteCommand(addProductCommand2);
// 商品の削除
invoker.ExecuteCommand(removeProductCommand1);
Command Patternの使い道
- 履歴機能を追加する際
- アンドゥやリドゥ機能を実装する際
- オブジェクトの状態を変更する操作をキューイングする際
組み合わせられるデザインパターン
- Composite Pattern: 複数のコマンドを一つのコマンドとしてまとめることができます。
- Memento Pattern: コマンド実行前後のオブジェクトの状態を保存・復元するのに役立ちます。
- Observer Pattern: コマンドの実行に伴って関連オブジェクトに通知が送れます。
まとめ
Command Patternの基本概念と利点を、具体的なシナリオとしてオンラインショッピングサイトでの商品の追加や削除の操作を例に紹介しました。
Command Patternは、コードの拡張性や再利用性を向上させ、メンテナンスを容易にするための強力なデザインパターンです。
是非、今回の記事を参考に、プロジェクトでのCommand Patternの活用・導入を検討してみてください👍
参考文献
【10分でわかる💻】TypeScriptでDesign Pattern〜Proxy Pattern〜
どうも、ちゃんなるです!
今回は、Proxy Patternを紹介します🖐️
概要
Proxy Patternは、オブジェクトにアクセスするための代理(プロキシ)オブジェクトを提供し、オリジナルオブジェクトの機能を拡張することができます。
利点は、アクセス制御やリソースの最適化などが実現できることです。
今回示すプログラムの設計
具体的なシナリオとして、APIリクエストのレート制限を実装するプロキシを作成しましょう🖐️
このプロキシは、特定の時間内に許可されるAPIリクエストの回数を制限し、それ以外の場合はアクセスをブロックします。
クラス図
以下に、Mermaid記法でのクラス図とMarkdown形式でのクラス図の説明を再出力します。
クラス図 (Mermaid記法)
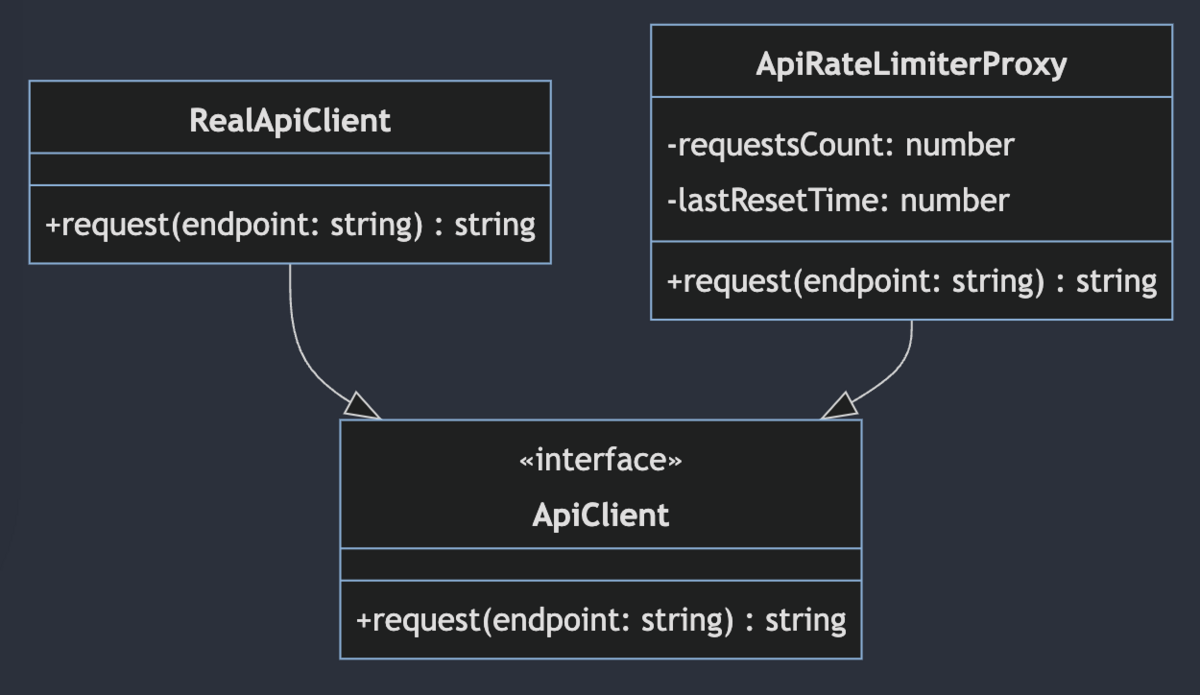
| クラス名 | 役割 |
|---|---|
| ApiRateLimiterProxy | APIリクエストのレート制限プロキシ |
| ApiClient | APIクライアントのインターフェース |
| RealApiClient | 実際のAPIクライアント |
サンプルコード
interface ApiClient {
  request(endpoint: string): string;
}
class RealApiClient implements ApiClient {
  request(endpoint: string): string {
    // 実際のAPIリクエスト処理
    return "API response";
  }
}
class ApiRateLimiterProxy implements ApiClient {
  private requestsCount: number;
  private lastResetTime: number;

  constructor(private realApiClient: ApiClient, private maxRequests: number, private resetInterval: number) {
    this.requestsCount = 0;
    this.lastResetTime = Date.now();
  }

  request(endpoint: string): string {
    const currentTime = Date.now();

    if (currentTime - this.lastResetTime > this.resetInterval) {
      this.requestsCount = 0;
      this.lastResetTime = currentTime;
    }

    if (this.requestsCount < this.maxRequests) {
      this.requestsCount++;
      return this.realApiClient.request(endpoint);
    } else {
      throw new Error("Rate limit exceeded");
    }
  }
}
では、実際に使ってみましょう🖐️
const apiClient = new RealApiClient();
const rateLimiterProxy = new ApiRateLimiterProxy(apiClient, 3, 60 * 1000); // リクエスト制限数を3に設定
console.log(rateLimiterProxy.request("/api/some/endpoint"));
console.log(rateLimiterProxy.request("/api/some/endpoint"));
console.log(rateLimiterProxy.request("/api/some/endpoint"));
console.log(rateLimiterProxy.request("/api/some/endpoint")); // 制限超過
errorになりました👏(errorになって喜ぶなんて珍しいですが笑)
API response
API response
API response
error: Uncaught Error: Rate limit exceeded
      throw new Error("Rate limit exceeded");
...
Proxy Patternの使い道
- アクセス制御
- キャッシュ機能
- リソースの遅延初期化
組み合わせられるデザインパターン
- Decorator Pattern: 機能を追加するために、既存のクラスをラップするデザインパターン。Proxy Patternと組み合わせることで、オブジェクトへのアクセス制御と同時に、追加の機能を実装できます。
- Facade Pattern: 複雑なサブシステムに対して単純なインターフェースを提供するデザインパターン。Proxy Patternと組み合わせることで、アクセス制御を行いつつ、サブシステムの利用を簡素化できます。
- Adapter Pattern: 互換性のないインターフェースを統一するデザインパターン。Proxy Patternと組み合わせることで、異なるインターフェースを持つオブジェクト間でアクセス制御を行うことができます。
まとめ
Proxy Patternは、オブジェクトへのアクセスを制御するための代理オブジェクトを導入することで、アクセス制御やリソースの最適化などを実現できるデザインパターンです。
ファイルシステムへのアクセス制御の例を通して、Proxy Patternの使い方を理解できたでしょうか👀
ぜひ、自分のプロジェクトにProxy Patternを適用して、その効果を実感してみてください。アプリケーションのアーキテクチャがより柔軟で効率的になることでしょう👍
参考文献
【5分でわかる📚】TypeScriptでDesign Pattern〜Flyweight Pattern〜
どうも、ちゃんなるです!
今回は、Flyweight Patternを紹介します🖐️

概要
Flyweight Patternは、多数の類似オブジェクトを扱う際に、メモリ消費を抑える効果があります。
今回示すプログラムの設計
シナリオとして、図書館の本の情報管理システムを考えます📚
各本は、タイトル、著者、ジャンルなどの情報を持っていますが、ジャンルは限られた数しか存在しません。
Flyweight Patternを使って、メモリ効率を向上させましょう。
クラス図

| クラス名 | 役割 |
|---|---|
| Book | 本の情報を表すクラス |
| GenreFlyweightFactory | ジャンルを生成・管理するファクトリクラス |
| GenreFlyweight | ジャンルオブジェクトを共有するためのインターフェース |
| Genre | 具体的なジャンルを表すクラス |
サンプルコード
interface GenreFlyweight {
  getGenre(): string;
}
class Genre implements GenreFlyweight {
  constructor(private genre: string) {}

  getGenre(): string {
    return this.genre;
  }
}
class GenreFlyweightFactory {
  private genres: { [key: string]: Genre } = {};

  getGenre(name: string): Genre {
    if (!this.genres[name]) {
      this.genres[name] = new Genre(name);
    }
    return this.genres[name];
  }
}
class Book {
  constructor(private title: string, private author: string, private genre: GenreFlyweight) {}

  getDetails(): string {
    return `${this.title} by ${this.author}, Genre: ${this.genre.getGenre()}`;
  }
}
では、実際に使ってみましょう🖐️
const factory = new GenreFlyweightFactory();
const thriller = factory.getGenre("Thriller");
const sciFi = factory.getGenre("Sci-Fi");

const thriller2 = factory.getGenre("Thriller");
console.log(thriller === thriller2); // true -> 同じインスタンスが参照されている👍

const book1 = new Book("The Da Vinci Code", "Dan Brown", thriller);
console.log(book1.getDetails());

const book2 = new Book("Angels & Demons", "Dan Brown", thriller);
console.log(book2.getDetails());

const book3 = new Book("Dune", "Frank Herbert", sciFi);
console.log(book3.getDetails());
Flyweight Patternの使い道
- 類似オブジェクトの多いシステム
- 大量のデータを効率的に管理したい場合
- オブジェクトの共有が適切である場合
組み合わせられるデザインパターン
- Singleton Pattern: Flyweight Patternと共にSingleton Patternを使用することで、ファクトリクラスを一意のインスタンスとして扱い、状態の共有や一貫性を保つことができます。
- Composite Pattern: Flyweight PatternとComposite Patternを組み合わせることで、複雑なオブジェクト階層を持つシステムでも効率的なリソース管理が実現できます。
- Factory Method Pattern: Flyweight PatternとFactory Method Patternを組み合わせることで、オブジェクト生成の詳細を隠蔽し、柔軟かつメモリ効率の高いオブジェクト生成が可能になります。
まとめ
Flyweight Patternは、多数の類似オブジェクトを効率的に管理するためのデザインパターンです。
このパターンは、メモリ使用量を削減することで、アプリケーションのパフォーマンスを向上させることができます。
今回の図書館の例では、ジャンルを表すオブジェクトを共有することで、メモリ使用量を抑えました。
このように、Flyweight Patternを適切に活用することで、システムの効率を大幅に向上させることが可能です👍